Microsoft Word is a handy tool that allows users to create documents. However, accidentally adding extra pages you don't need can be frustrating.
You may have inserted a page break where it wasn't required or accidentally pressed ‘Enter’ too many times to add blank space. Whatever the reason, having pages in your Word document that you want to remove can disrupt the flow of your content.
Luckily, Word offers some simple methods for deleting pages.
This guide will explore three easy ways to delete a page in Word and eliminate unwanted Word pages. Following these steps, you can quickly remove blank pages, pages with content, or sections to clean up your documents.
Let's get started!
Method 1: Use the Navigation Pane to Delete Pages
One of the easiest ways to delete a page in Word is through the Navigation Pane, which lets you visually interact with your document's pages. Here are the basic steps:
1. Click the "View" tab.
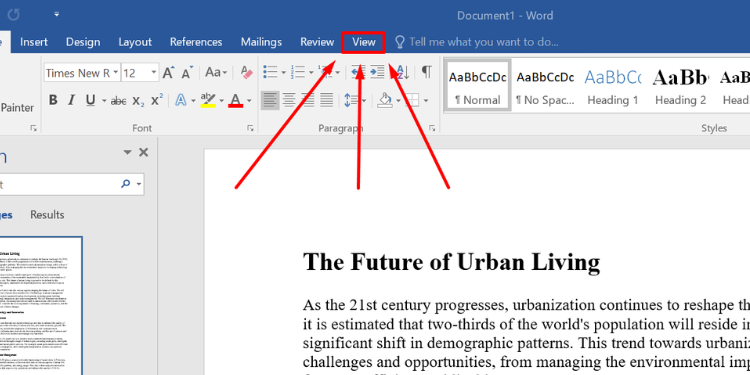
2. Select "Navigation Pane" in the show group.
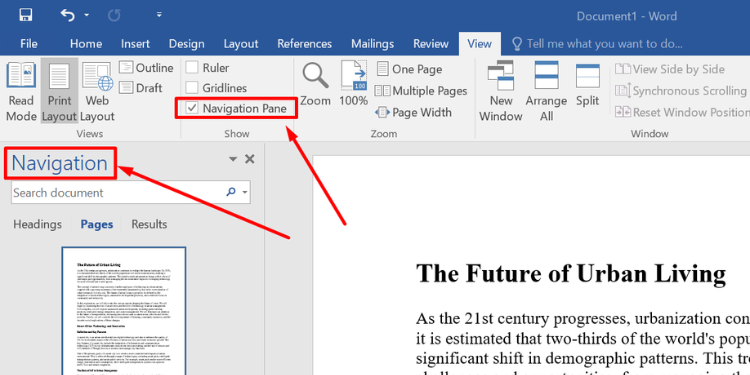
3. This will open the Navigation Pane panel on the left side of your Word window.
4. Click on the "Pages" tab at the top of the pane if it's not already selected.
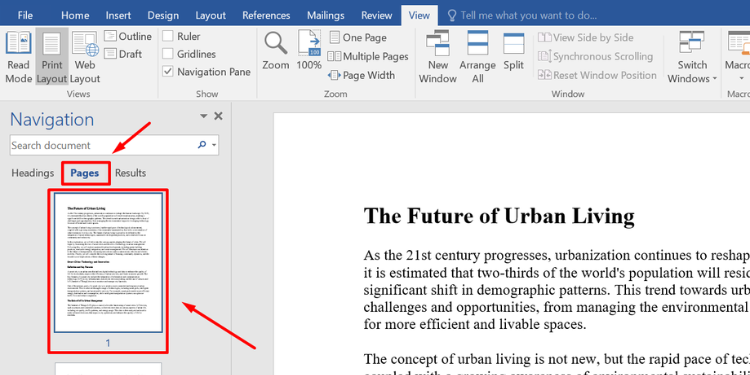
5. You'll now see thumbnails of each page in your document.
6. Find and click on the thumbnail of the page you want to remove.
7. Press the "Delete" button/key to remove the selected page.
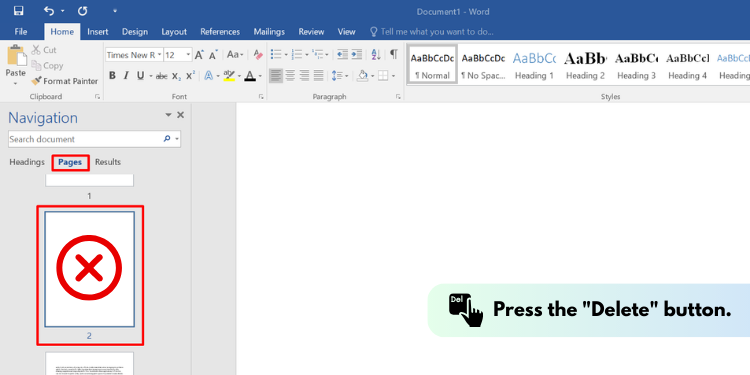
8. A message will pop up confirming removal - click "Yes."
9. And just like that, the page is gone!
Using the Navigation Pane is simple and effective if you need to delete a page from anywhere within a longer document. The thumbnails provide an at-a-glance view of your page layout, too.
Method 2: Use Show/Hide Paragraph Marks
One of the handiest ways to delete a page in Word is using Page Break View. This view lets you easily see any page or section breaks inserted in your document. Being able to spot these breaks makes deleting blank pages a breeze.
To use Page Break View:
1. To access Page Break Preview, press Ctrl+Shift+8 on Windows or ⌘+8 on a Mac.
2. You can also open Break Preview from the Home Tab.
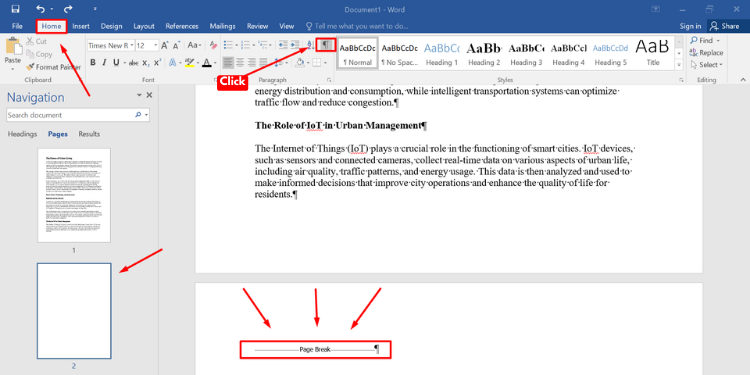
3. This will activate Page Break View, and you'll see tags indicating where each page starts.
4. Scroll through to locate the page you want to remove.
5. Click on the page break above the page and press Delete on your keyboard.
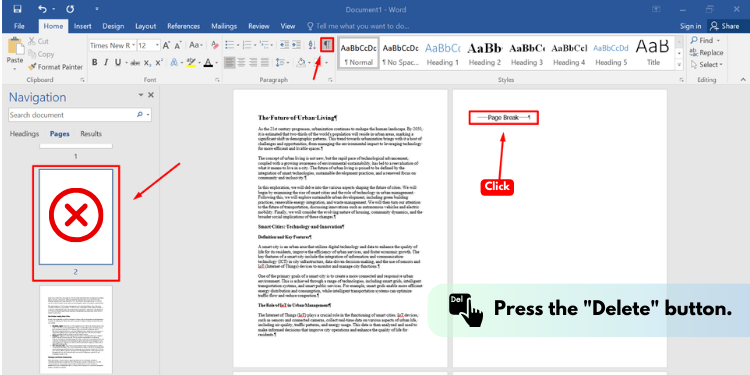
6. The page will be instantly removed!
7. Press Ctrl+Shift+8, or your document may seem awkwardly formatted.
Using Page Break View is one of the fastest methods and works whether you need to remove a blank page or one with existing text and formatting. It only takes a few seconds to scan, select, and delete an unwanted page in Word this way.
Method 3: Use Keyboard Shortcuts for Precise Page Deletion
For times when you want more control over removing a specific page, keyboard shortcuts come in handy. Rather than broadly targeting a page break, these allow you to delete the content on an individual page:
1. Navigate to the top of the page you want to remove. This could involve using the Page Up/Down keys or the Go To dialog box.
2. Select all the text (Ctrl + A) and formatting on the current page by clicking and dragging your mouse from top to bottom.
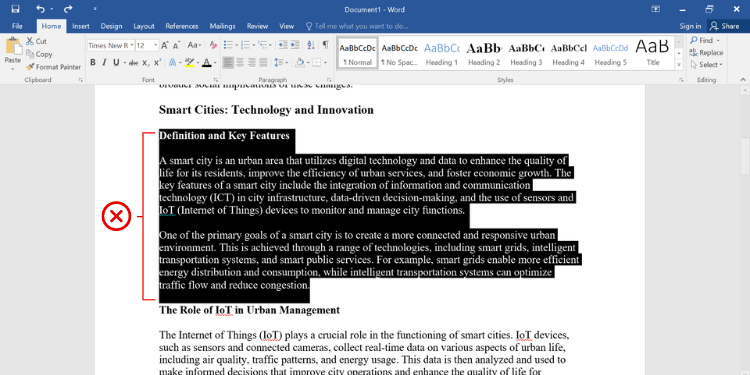
3. Press Ctrl + X on Windows or Command + X on a Mac to cut the selected content.
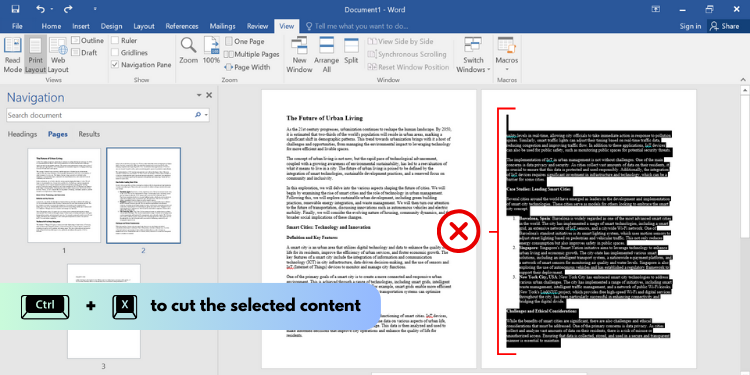
4. Now, use the Page Down key to move to the next page.
5. At the top of this page, position your cursor and press Delete.
6. This will remove the page content you previously cut without messing with styles on surrounding pages.
7. Be sure to save your document when complete.
Using keyboard shortcuts gives you precise control over page deletion. This is helpful when removing only specific elements on a page without impacting other areas.
Additional Tips for Tricky Page Removal Scenarios:
While the above methods cover many basic page-deleting needs, here are some extra tips to know:
- Check for existing page or section breaks contributing to blank pages and remove those first before deleting the page itself.
- Hidden paragraph marks can keep blank pages stuck at the end of documents. Make these smaller by selecting them and reducing the font size.
- Delete any leftover images or tables contributing to blank space after the fact. Word sometimes inserts blank pages after these elements.
- In online Word editors without page view options, try highlighting all content on the target page and pressing Delete.
- Avoid accidental page deletions by ensuring your selection comprises only the required page's content area before pressing Delete.
With some practice, these page removal techniques can be committed to memory. Knowing your way around Word's formatting and features helps you shape documents exactly how you want them. These methods allow you to delete unwanted pages faster and reduce clutter in your Microsoft Word documents. Let me know if you have any other questions!
Conclusion
This guide provided easy ways to delete unwanted pages in Word. The methods take just a few clicks to remove blank pages, content pages, or sections. Now, you can quickly organize your documents however you prefer. We're excited to share these tips that help maintain neat files.
Best of all, you can focus on excellent writing instead of formatting problems. Use what you learned to make polished papers and reach your goals. Thanks for learning with us! Please feel ready to optimize Word and create great content.